If you can make a solid knot with thread you can embroider. And with the holiday season coming up, embroidery projects make an amazing present. In the next few paragraphs I’ll walk you through everything you need. Don’t be intimidated! It’s fun, relaxing and you will love your results.
Embroidery Image Inspiration
I am going to use a piece I did recently called the “Aerial God” to illustrate the process. But you can use any image: a photo of a love one, a butterfly, your cat…For your first project I would not choose any image bigger than 8×8 or 8×10 inches. Don’t worry about how much detail is in the picture. Just choose an image that has clean distinct lines and little or no background. For me I chose a man doing aerial gynastics.
Embroidery Supplies
Now it’s time to head to your local fabric store, Michael’s, Joann or Walmart to get what you need. The best part about embroidery is your supplies are so inexpensive. The basics you need are as follows:
- DMC or equivalent floss. 6 stranded floss not non-stranded. Cost about $ .40. Start with black and buy other colors as you see fit.
- Embroidery hoop – I like to use the plastic hoops. They come in different sizes. But a 7 or 8 inch hoop is good to get started. Cost $3-$4
- Embroidery needles- cost $1.50
- Tracing paper -either sewing wax paper or graphite paper. They come in different colors so choose a multi-color pack or at least one dark and one light color paper. – $3
- Scissors – make sure to have a good pair of scissors to cut your fabric. If you think you plan to do a lot of embroidery, invest in a good pair of small embroider scissors.
Now as for the fabric you embroider on, choose a fabric with a tight thread weave. I generally use 100% linen or a medium weight cotton. Even a cotton with 3-5% spandex is ok. Start with half a yard of a neutral color fabric (white or cream). If the fabric weave is too loose you will have a mess on your hands when you try to stitch.
Laying Out Your Embroidery Project
Place your tracing paper on the fabric and then lay your image on top. I usually secure the image to the cloth with a pin so the image doesn’t move while I trace. Then trace the images onto the fabric. The trick to getting a good representation is that you don’t trace every line in the image. Trace the outline of the image with a pen over your image. If it’s a portrait, outline lips, bottom of nose, eyebrows or any distinguishing elements of the face. If you trace too many lines you will be stitching forever.
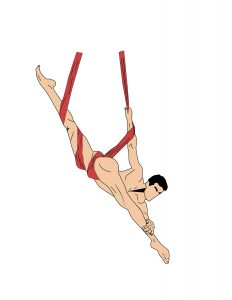
Illustration
See image one of my example. I don’t even do his lips or nose. In my example I traced on linen, cut it out and sewed it to a polka dot background. You don’t have to do that. Just keep it basic with one fabric.

Image 1 -Tracing
Stitching
Before you stick that needle into the fabric, get a piece of practice fabric and practice your stitch. The best stitch to use is the back-stitch for outlining the project. I will post a link to a video tutorial.
First take your floss and cut off about 12 to 15 inches of floss to start. Next is probably the hardest part of embroidery: separating the floss strands. Your floss will have 6 individual strands wrapped to form the thread. Pull apart at least 3 strands of floss to start. Take one end and start by separating three strands. Then slowly pull all three away from the other three strands until they are fully separated. Now you will knot the end of the three strands together and thread them thru your needle. Floss can go a long way. It’s rare that you will sew with all 6 strands. The more strands of floss you use the thicker your line will be. We just want to use 2 or 3 threads for our outlines.
Put the fabric in your hoop and make sure the fabric is stretched tight like a drum. You will have to tighten the hoop from time to time as you stitch. I cannot stress the importance of tight fabric as you stitch. Otherwise the thread lines look distorted once removed from hoop.
See image two of my example. I only use two strands of floss to outline the body. For his hair I use the satin stitch.
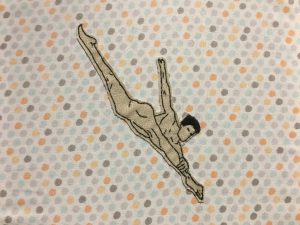
Image 2 – Backstitch
Finishing Tips
Sometimes there are lines in an image that are too hard or too small to stitch. Here is a great option – acrylic paint. Just paint the areas of the fabric using black paint to get tough to reach spots. In Image 3, I painted the shadow under his face. You can barely tell. Paint helps add dimension.
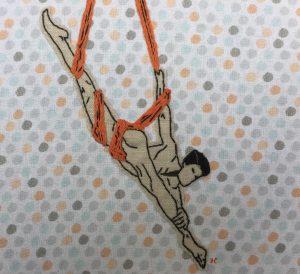
Image 3 – Final
When you finish, you can either find a wood hoop to display it in or take it to a framer. That’s it. For under $10 you can make an amazing gift or piece of fine art.
If you would like to see more of my work, head over to Instagram and search for Thread_bro.
Cheers
Wow!! Amazing and unique embroidery.