
Custom Throw
I had decided to re-paint a guest bedroom in my home to freshen it up. This lead to a whole room make-over. The walls were painted a light blue with crisp white trim. But something was missing. I needed a little bling to make some of the room decor pop. I felt I could add that pop with a custom throw for the bed. But as I shopped around I could not find anything I wanted.
So whenever I am faced with an obstacleI take it head on. I stopped looking for a ready-made item and decided to create it myself.
In order to determine how much fabric I needed, I measured the queen bed it would rest on. I measured the width and desired fall. The width of the standard queen bed was 5 feet and the desired fall on each side, was 2 foot, meant I needed a 9 foot width: or 3 yards. I only wanted the custom throw to cover about 2 feet at the end of the bed and have a 2 foot drop. Therefore, I needed a fabric that was 50 inches or wider.
Shopping For Bling
I shopped in the Garment District in NYC for hours until I found the perfect fabric tucked in the back of the showroom. A rainbow, metallic, striped woven fabric. The only problem was this fabric was as thin as paper. To be honest I don’t even know what kind of material it was. When I asked the width, the salesperson said it was 60 inches. Perfect. And at $8 a yard, it was a winner. However, when I got it home it turned out only to be 52 inches. I was lucky in that I only needed a 50 inch fabric. So next time I will double check the width before committing to the fabric.
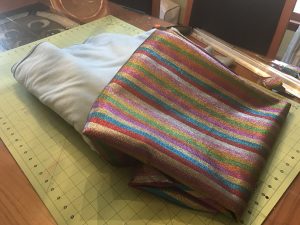
The only remaining issue was the paper thin weight. I didn’t want the fabric to slide off the bed due to its light weight. So the solution I found that worked best was to back it in a heavier weight fabric. A lightweight knit or corduroy are probably the least expensive options. But I discovered another alternative: fleece. Fleece generally sells for about $3 a yard and comes in many colors. I chose a light blue that matched the walls. The following tutorial walks you through the steps you need to create a custom throw. If you have a sewing machine and some patience, you can finish a project like this in an afternoon.
Tutorial
1. Cut your top fabric to the desired length and width. Then cut the width of your fleece (or alternative fabric) a half inch to an inch shorter The latter will depend on the stretchiness of the fabrics. I cut the width of the fleece smaller so I could line up the ends when I sew them closed.
2. With right sides facing, pin the edge of the long side of the two fabrics. I pinned every six to 8 inches.
3. Baste your seem with whatever seem allowance your prefer (3/8 to 5/8 of an inch). Basting will help you if you screw up the seem. Trust me this can be a nightmare on a seem that is 9 feet long.
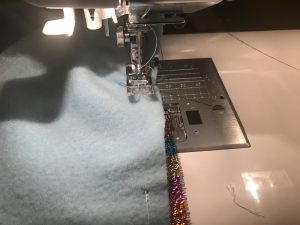
4. After you have removed the pins, go back and stitch as close to your basting stitch as you can. Begin and end your stitch by backtacking so the seem does not come loose. When you finish, trim the seem allowance back (leave at least 1/4 inc). Repeat for the other long edge of the fabric.
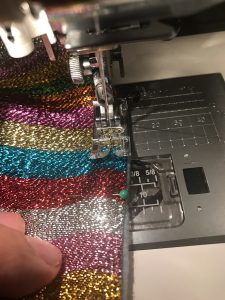
5. With right sides still facing each other, sew one of the bottom seems. You will want to pin the end seem every inch or so. As the fleece fabric has give and stretch, you may need to manipulate and gather the fabric as you pin.
6. On the last remains open side, you want to close the remaining edge but not completely. You need to leave a gap of 4 to 5 inches. Measure the seem and subtract 4 inches. Take the result and divide by 2. Now measure in from the seem edge and mark with a pin. Do the same for the other end of the seem. Now sew up to the pin on both ends. You should have a 4 inch gap left.
7. Using the “bag method”, reach inside to the bottom and grab the interior fabric and pull through the hole. You are turning the fabric inside out so the right facing fabrics will be on the outside.
8. Pin the top seem that has the gap (folding under the seems of the gap). Carefully top stitch from corner to corner about an 1/8 an inch from the edge. Continue around the rest of the fabric until all sides are complete.
9. Depending on your fabric, you may want to tac the two fabrics together at multiple points.
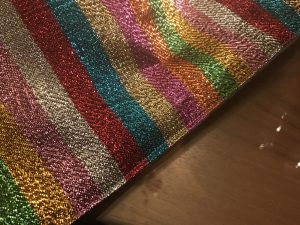
That’s it. You are done. For $35 I created a custom throw. So don’t be afraid to use unexpected fabrics. Embrace them.